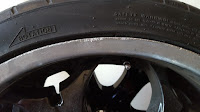
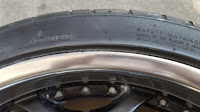
One of the most frustrating things to happen to a motorist is wheel damage caused by taking a turn too tightly and hitting a curb. I've done it myself to all four of my 20" OZ rims on our primary mobile detail rig. In addition to looking bad, there is a second problem that can occur after you get curb rash on your wheel. Curb rash breaches the wheel clear coating and often once that coating is breached it gets worse over time as moisture gets in under it and causes bubbling and flaking.
 |
| 22" Rim with moderate curb rash |
 |
| 22" Rim Repaired |
At our detail and auto reconditioning shop, Black Label Motoring, based in Vancouver, Washington, we've seen all kinds of damaged wheels. Not only do we see conventional curb rash damage, but also bent, cracked and on occasion, melted wheels. (Yes, actually melted.) The truth is, not all damaged wheels can be fixed. Some are so damaged that even though they could be cosmetically refurbished, the structural integrity of the metal cannot be assured and the legal liability for a shop "fixing" the wheel and letting a customer drive on it would be formidable. Many wheels can be fixed, however, and much more easily and inexpensively than you might think.
Let's talk a bit about price for wheel restoration before we get into the details of how to do it yourself. We charge, on average, less than $60 per wheel restoration at our shop. If you have ever called around to wheel repair and restoration specialists, you'll find that the average price they charge now is around $150 and some special wheels can run closer to $300. Why is there such a huge difference? Well there are a couple of reasons. Firstly, almost all of the wheel repair shops you will call are part of a franchise, meaning some guy decided he wanted to start a business and bought into a wheel repair franchise. This cost serious up front money and the business owner has to recoup that money somehow. Many also have to pay ongoing fees back to the franchiser and have pricing for services dictated by the franchiser. Secondly, they have often invested huge amounts of money in equipment. This may include a fully equipped mobile rig, and special large scale machining equipment that can easily run into six figures. You are probably now saying that all that expensive equipment ensures that they can do the job better than a shop that doesn't have it. Well, not exactly.
Let's use an analogy from the clothing industry. Which is the better suit, the one made entirely by expensive, complex machines in an assembly line in China, or the one made entirely by hand by an master tailor in Italy? The first one sells for $200 at Macy's and the second one sells for $6,000 at the Brioni boutique in Milan.
With skill, time and a few hand tools, you can fix your wheels and make them look new for very little money.
Honestly, some wheels have extremely complex, multi-faceted finishes and the specialist wheel repair services can get a better finish than we can or you could. But that is maybe 10% of the wheels out there. When we come across a wheel like that we refer them to some of these specialist. Most other wheels, however, can be repaired to identical standards of the pros by following some simple rules.
First, you need to determine if you can repair the wheel on the car or if it must be removed and dismounted. This depends on the amount of curb rash and damage there is. I would state up front that the result you can get by removing the wheel and dismounting it is always better than what you will get if you try to repair it on vehicle. Repairing a wheel on vehicle is only recommended if the curb rash or other damage is minimal (scrapes in finish, discoloration, etc.)
Let's assume that the wheel isn't that bad and can be fixed on vehicle. We'll walk through how to do that step by step.
STEP1.
Clean the wheel thoroughly. Clean it better than you have ever cleaned it before. If there are parts that have embedded brake dust and rust, you make need to scour them out with steel wool or a wire brass wire brush. You can get these items at a lot of places.
STEP 2.
Perform any repairs needed to the wheel. If there is some curb rash you can use a variety of hand tools to minimize or remove it. One tool is an upright drill. You can buy one of these for $30 at Harbor Freight and you can also buy a small grinding and sanding kit there which will help you do this. A second tool is a Dremel tool that usually comes with a variety of grinding bits. Having a variety of sand paper from 180 grit up to 600 or 800 grit is also helpful. We'll post some video of how this process goes.
STEP 3.
Once the major damage is removed, you need to prep the rest of the wheel paint for re-spray. To do this you need to go over every bit of the wheel with scruff pads. You can get proper ones at a professional paint supply store , or if you're in a hurry, borrow one of the green dish cleaning scruff pads your wife has in the kitchen. The professional ones will do a better job but if you're trying to go cheap, the kitchen stuff will do. As you go over the wheel paint you want to keep working it until all the shiny parts are changed to a dull satin finish.
STEP 4.
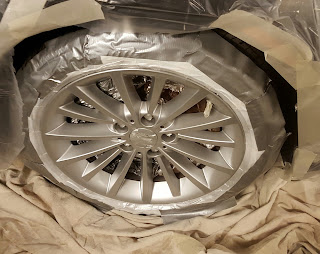
You need to tape off the tire and protect the car finish from over spray. If you watch guys on YouTube you will often see them using these little pre-fab metal cards which fit in between the tire and lip of the wheel. They will swear this is the best way to do it. Actually, it's the fast way to do it, but it has lots of problems. One problem is they don't fit every wheel tire combo in exactly the same way. Some wheels have pronounced metal lips, some do not. Secondly, they do not account for wind if you are doing this in the field (which most of the YouTube guys suggest) and you can get over spray on the tire or the car for that matter. We prefer to tape the wheel off, then cover the surrounding body panels with plastic as well. You will have to put plastic inside the wheel and cover the rotor and caliper. The plastic should be loose fitting so that it rests on the inner wall of the tire. When it's all done it should look like this.

Note that the plastic rests inside the wheel without any hard taped edge and tape is also covering the wheel center cap and all the bolts. The tape used to create the strong edge between the tire and wheel is a white duck tape that is pretty sticky and the silver tape around that is less sticky but wider to cover the entire sidewall of the tire. Now you paint? But what color? I will not tell you everything but if you own a BMW, Mercedes, Volvo, Saab, or quite a few other cars, Duplicolor "Chrysler Ultra Silver" is an exact match for many of the European "hyper-silvers". It should be since the color came from their affiliation with Daimler. Use at least two color coats (3 is better) then let each one sit for 10-15 minutes before applying the next coat. After letting the final coat sit for 25-30 minutes, hit the wheel with clear coat. We use a Rustoleum High-Heat thermal clear coat that works well and stands up to the constant heating and cooling caused by braking. Put at least two coats of clear on and let it completely dry before removing any of the tape or plastic. Give the clear coat some time to harden before driving (at least 8 hours).
Okay, now let's assume that the wheels are torn up pretty bad so you have taken them off the car and had them dismounted (by a proper tire place.) For the most part the process is the same as above except you can do things like painting the inside and do more extensive repairs. We see some stuff that is so damaged that we either turn the customer away or make them sign a waiver before we even touch the tire. You can repair a wheel from a cosmetic perspective but that doesn't mean the integrity of the metal is sound.
Take a look at these pictures of BBS wheels from a Subaru WRX. In this technique we use a cold-weld product with is a steel infused epoxy that bonds with the metal. It takes about 24 hours to cure but is very strong and can be shaped, ground and sanded like metal once cured. A lot of hand work must be done to these heavily damaged wheels and we use a variety of files, special Dremel tool attachments and a 3" inch upright grinding and sanding system. By using he cold weld technique, we can eliminate the need to remove tons of the original wheel lip to grind out the curb rash, instead over-building the damage areas and grinding and sanding the over-build parts level with the remaining undamaged wheel lip areas.
 |
| BBS Wheel w/Severe Curb Rash | |
|
 |
| BBS Wheel Repaired & Painted |


